|
|
Shift Settings
Shift Settings allows users to create, modify, and delete shifts and schedules. IXM WEB application users can assign and change the Shifts & Schedule for Employees. It offers the following tabs to save relevant information:
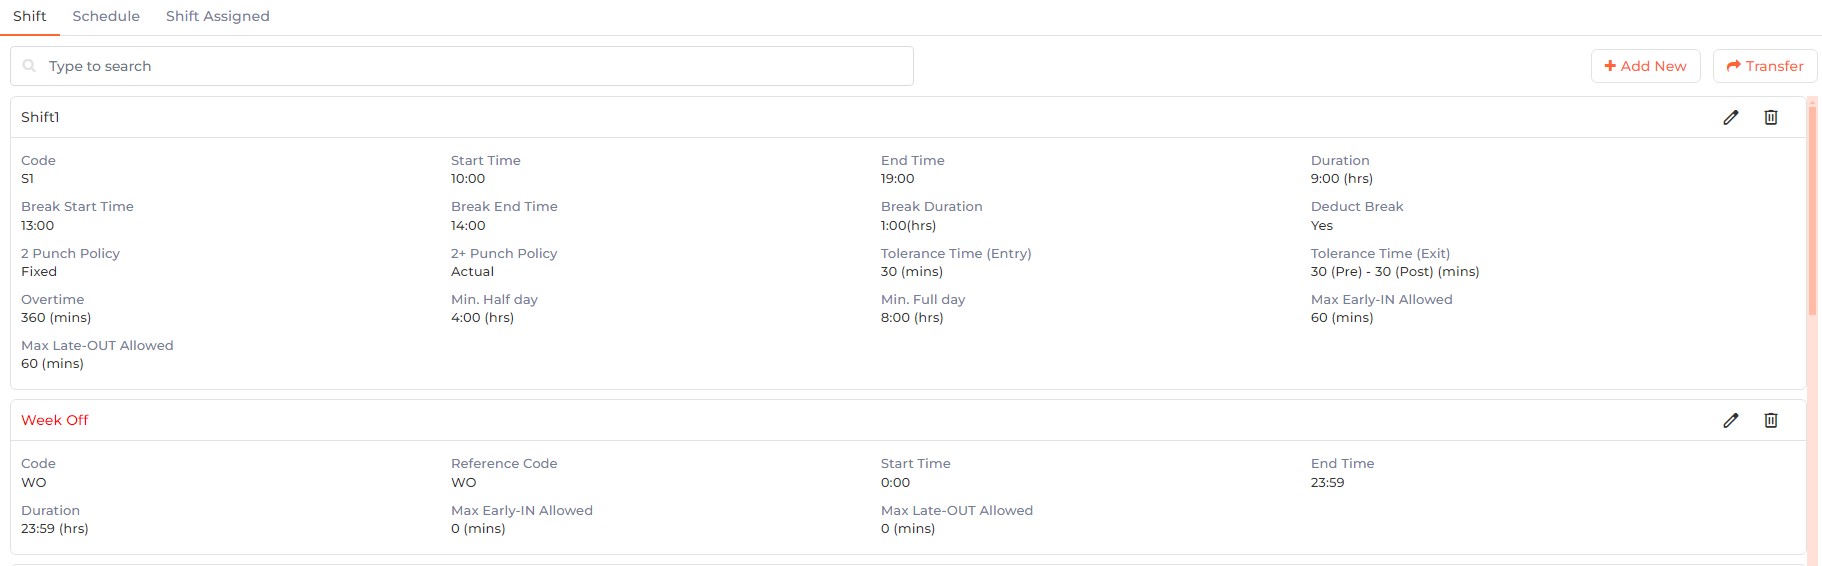
Screen Layout of Shift
Field Description of Shift
 One shift will be created by default in the software. You can either modify the available shift or add a new shift.
Click on Add New button to add a new Shift or click on  icon to edit the Shift. The following options will be displayed -
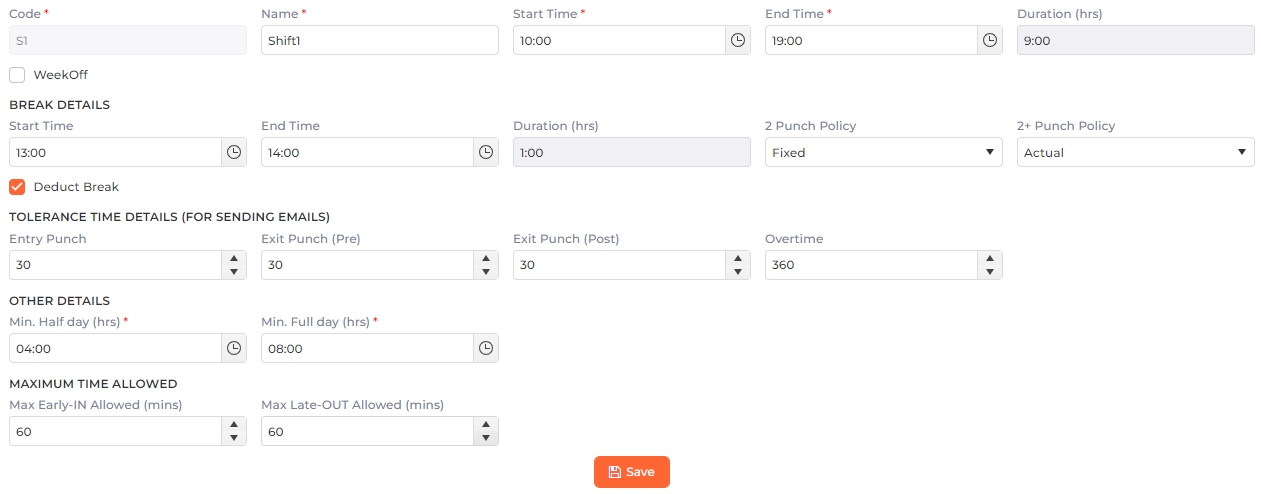
SHIFT DETAILS
Code:
Denotes a unique identification for the Shift.
While adding a new Shift, enter its unique Code. You can enter a maximum of 3 characters.
While editing the Shift, the value of this field can not be changed.
Name:
Enter the name of the Shift.
Start Time:
Enter or select the Start Time of the Shift in hh:mm format.
End Time:
Enter or select the End Time of the Shift in hh:mm format.
Shift Duration:
Shift Duration will be calculated automatically based on the provided Shift Start and End Time.
BREAK DETAILS
Start Time:
Enter or select the Start Time of the Break in hh:mm format.
End Time:
Enter or select the End Time of the Break in hh:mm format.
Duration:
Duration will be calculated automatically based on the provided Break Start and End Time.
2 Punch Policy:
Select the 2 Punch Policy for deduction from the dropdown list.
Select None option if there will be no deduction in the total hours worked daily by an Employee based on the Break Duration.
Select Fixed option if the defined Break Duration will be deducted from the daily hours worked for each Employee.
2+ Punch Policy:
Select the 2+ Punch Policy for deduction from the dropdown list.
Select None option if there will be no deduction in the total hours worked daily by an Employee based on the Break Duration.
Select Fixed option if the defined Break Duration will be deducted from the daily hours worked for each Employee regardless of the Break related transactions.
Select Actual option if the actual Break Duration will be deducted from the daily hours worked for each Employee based on their actual transactions for each break.
Select Fixed if less otherwise actual option if the break duration for the Employee is less than the defined Break Duration then the defined Break Duration will be deducted for daily hours worked. If the Break Duration is more than the defined Break Duration then the actual Break Duration will be considered for the calculation of daily hours worked.
Deduct Break
Click on the checkbox to enable or disable the feature. By enabling this feature, Break Duration will be deducted from the total hours worked by an Employee.
TOLERANCE TIME DETAILS (FOR SENDING EMAILS)
Entry Punch:
Enter the duration after Shift Start Time when an email for Missing IN punch will be sent if the punch for an Employee is not found in that duration.
Exit Punch (Pre):
Enter the duration before Shift End Time (Pre) when an email for Missing OUT punch will be sent if a punch for an Employee is not found in that duration.
Exit Punch (Post):
Enter the duration after Shift End Time (Post) when an email for Missing OUT punch will be sent if a punch for an Employee is not found in that duration.
Overtime:
Enter duration after Max Late OUT period to send an overtime email to the reporting manager.
OTHER DETAILS
Min. Half Day (hrs):
Enter Minimum working hours required to consider as a half-day present.
Min. Full Day (hrs):
Enter Minimum working hours required to consider a full day present.
MAXIMUM TIME ALLOWED
Max Early-IN Allowed:
Enter or select the duration (in minutes) before Shift Start Time to consider punch valid for attendance calculation.
Max Late-OUT Allowed:
Enter or select the duration (in minutes) after Shift End Time to consider punch valid for attendance calculation.
Click on Save button to save the Shift settings. Click on Cancel button to discard the action.
|
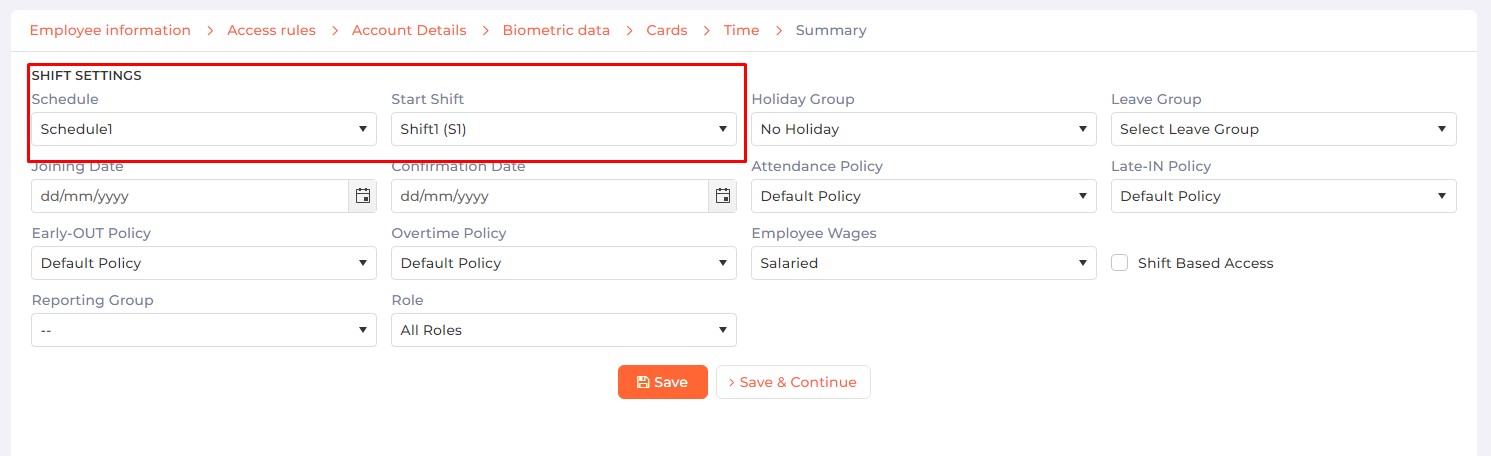
NOTE After Shift and Schedule configuration, admin can assign it to applicable T&A Employees from Employees >> Add/Edit Employee >> Time section.
|
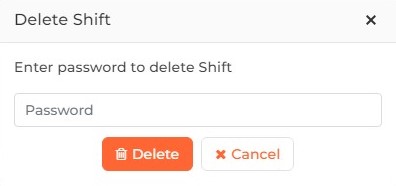
Select Shift(s) that need to be deleted. To select multiple shifts, tap and hold CTRL and select the required Shifts. Click on the  icon to delete selected Shift(s) from IXM WEB as well as from Device(s). The application will ask for credentials as follows -
|
|
Enter valid credentials and click on Delete button to delete the selected Shift(s).
Click on Cancel button to discard the action. |
On successful validation, the application will ask for the Device(s) from which the Shift(s) have to be deleted:

Click on the arrow keys to expand the Device Group and select the desired Device(s) by clicking on the checkboxes.
Once selected, click on Delete button to delete the selected Shift(s) from the selected Device(s).
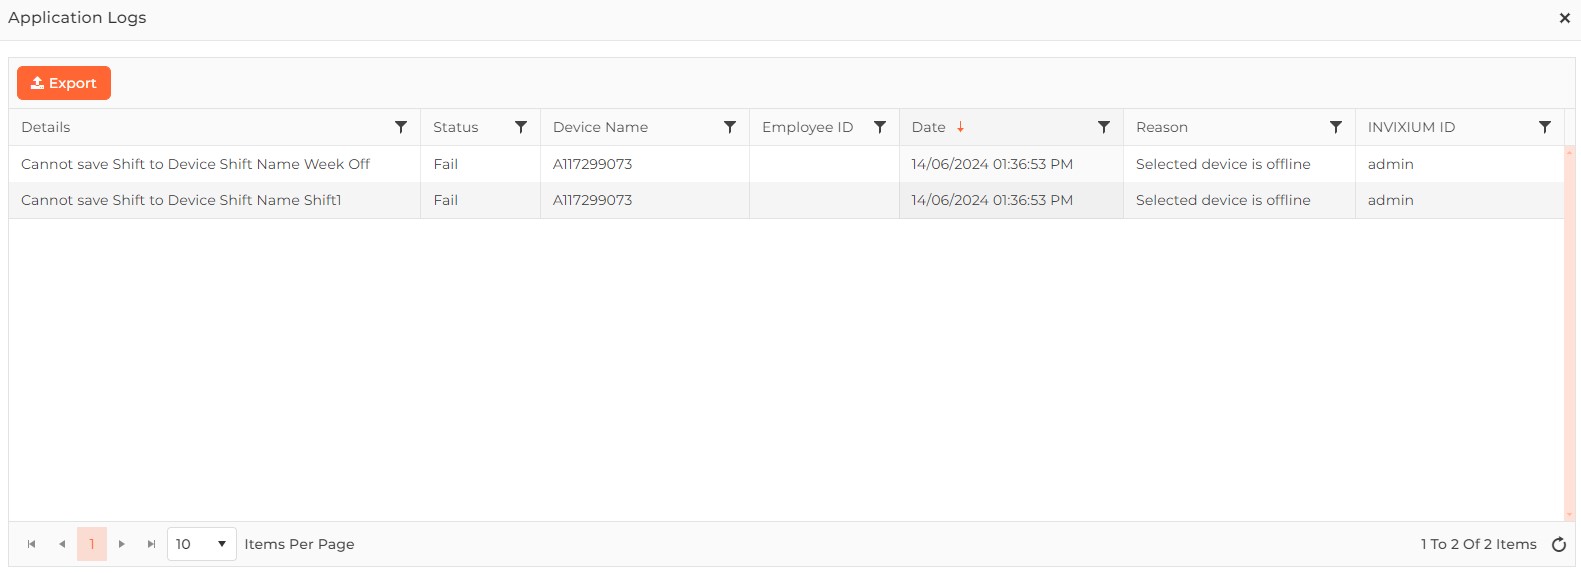
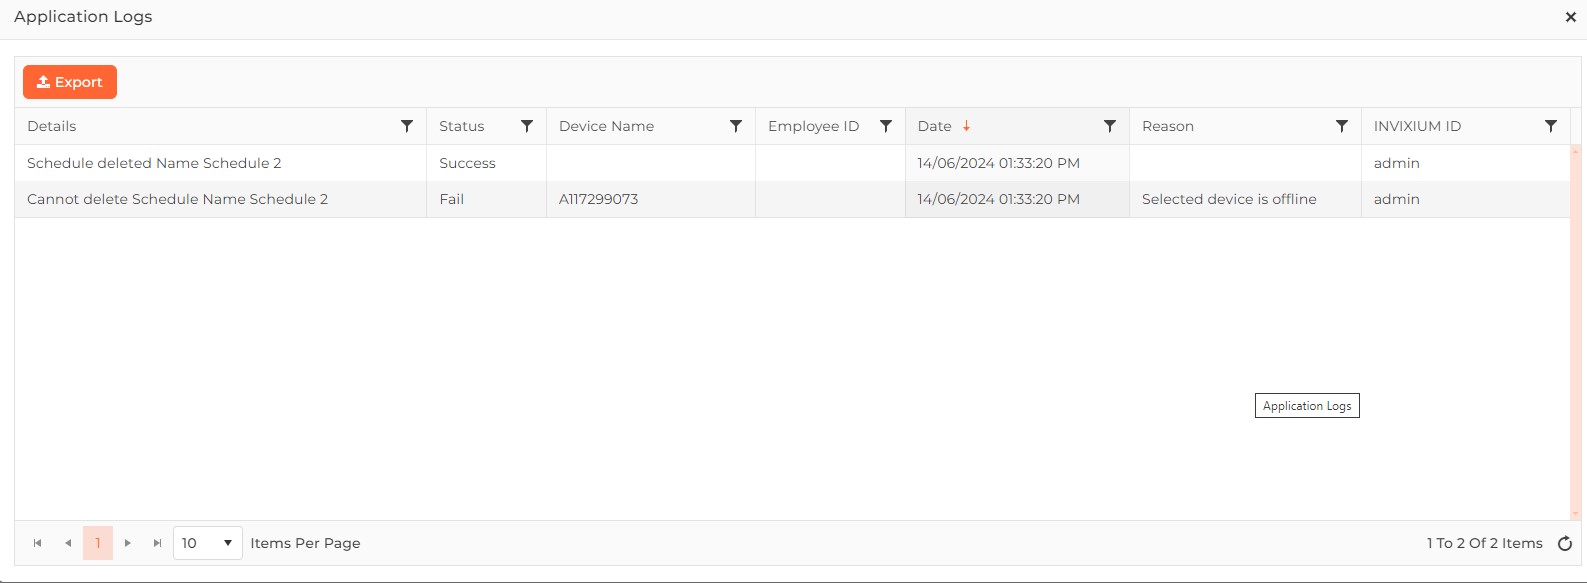
Upon completion of the process, the “Application Logs” window will show a success or failure message -

The deleted Shift will still be displayed on the screen. But the Delete button will be replaced with a Clone button. Click on the Clone button to create another Shift using the details of the deleted Shift. You can make required changes to the new Shift while adding it.
Transfer of Shift to a Device may be required for Shift Based Access feature (Controlling employee’s access to areas, based on shift timings)
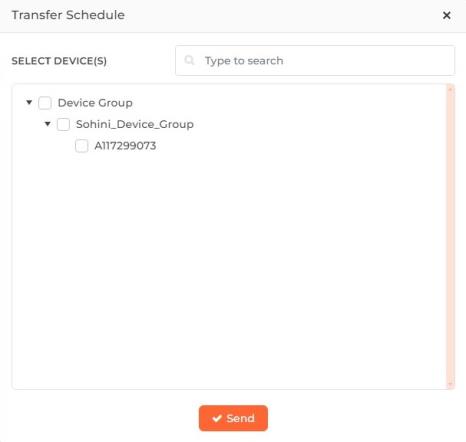
Select Shift(s) that need to be transferred to the Device(s). To select multiple shifts, tap and hold CTRL and select the required Shifts. Click on the Transfer button in the top right of the screen to transfer selected Shift(s) to the selected T&A Device(s). Following screen will be displayed to select the Devices -

Click on the arrow keys to expand the Device Group and select the desired Device(s) by clicking on the checkboxes.
Once selected, click on Send button to transfer the selected Shift(s) to the selected Device(s).
Upon completion of the process, the “Application Logs” window will show a success or failure message -
Screen Layout of Schedule
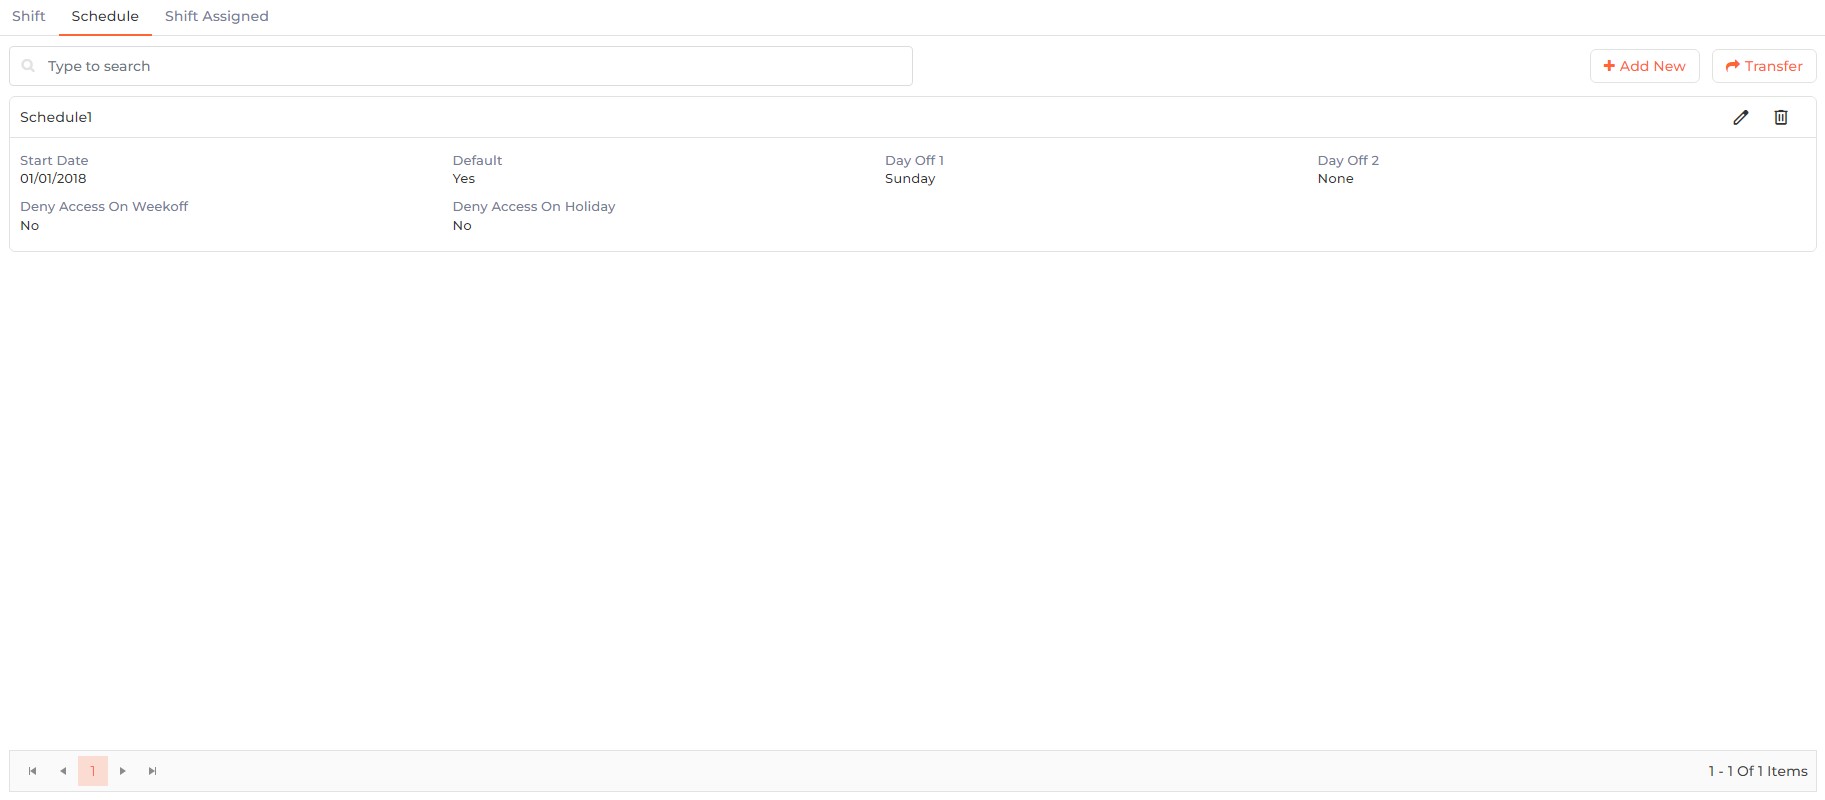
Field Description of Schedule
The purpose of a schedule or roster is to define shift, weekly offs, and the rotation of employees at work by assigning a pattern for a defined period.
Search:
You can search for a particular Schedule by entering its full or partial name. Once entered, either press <Enter> key or click on Search button. The list will be refreshed with Schedules matching with the entered name.
Click on Add New button to add a new Schedule or click on icon to edit an existing Schedule. The following options will be displayed -
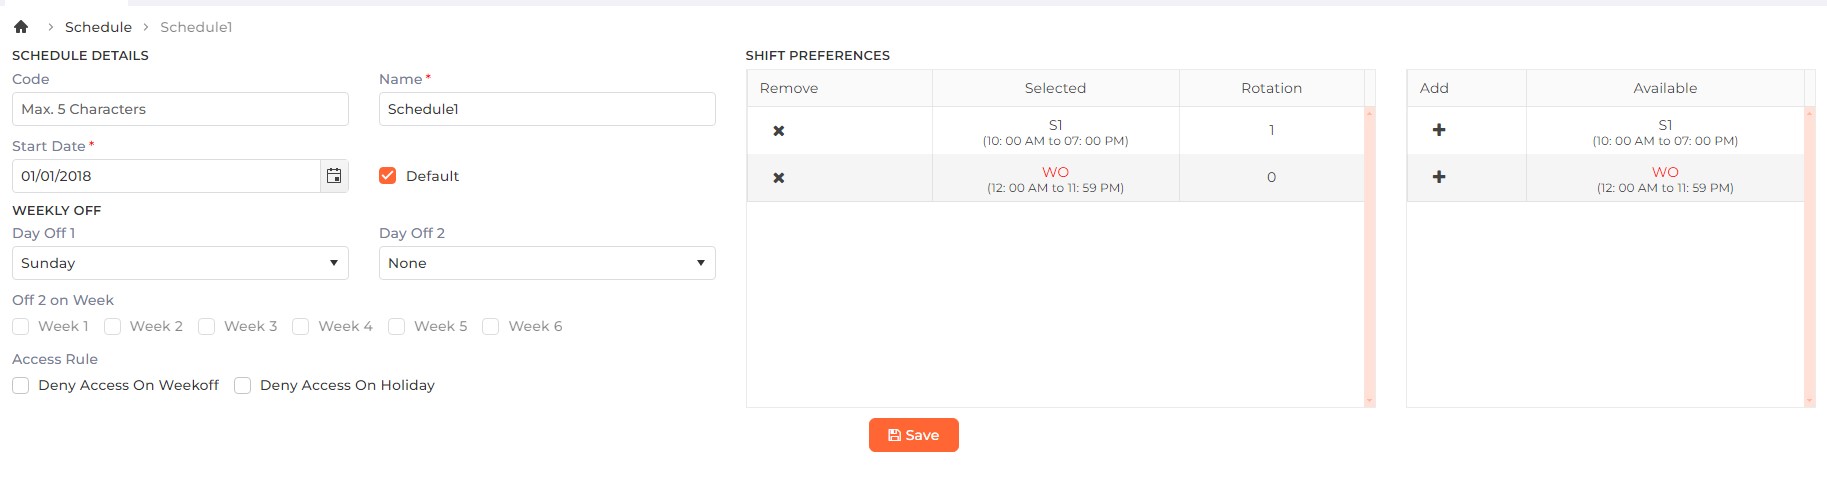
SCHEDULE DETAILS
Name:
Enter the name of the Schedule.
Start Date:
Enter or select the date from which the Schedule will come into effect.
Default
Click on the checkbox to enable or disable the feature. Enable it if you want to set this Schedule as the default Schedule.
SHIFT PREFERENCES
Add all the Shifts which need to be applied under this Schedule. Two tables will be displayed. The left side table contains the selected Shifts ("Selected" table) and the right side table contains all the Shifts ("Available" table).
Click on the respective + icons in the "Available" table to add Shifts to this Schedule. Selected Shifts will be displayed in the "Selected" table.
Click on the respective x icons in the "Selected" table to remove Shifts from this Schedule.
In the "Selected" table, specify the rotation days (including a week off and holiday) after which a Shift should be changed.
WEEKLY OFF
Day Off 1:
Provide the first week-off day by selecting it from the dropdown list.
Day Off 2:
Provide the second week-off day by selecting it from the dropdown list.
Off 2 on Week:
This option will be enabled only if Day Off 2 is not selected as "None".
The Day Off 2 can be selected for specific weeks if needed. For example, If Week 2 & Week 4 is selected then Day 2 Week off will be considered for those 2 weeks only.
Click on the checkboxes of the required Weeks.
Access Rule:
Deny Access on Week off:
Click on the checkbox to enable or disable the feature. Enabling this option will not allow employees access on Week off days.
Deny Access on Holiday:
Click on the checkbox to enable or disable the feature. Enabling this option will not allow employees access on Holidays.
Click on Save button to save the Schedule settings. Click on Cancel button to discard the action.
Select Schedule(s) that need to be deleted. To select multiple Schedules, tap and hold CTRL and select the required Schedules. Click on the icon to delete selected Schedule(s) from IXM WEB as well as from Device(s). The application will ask for credentials as follows -
|
|
Enter valid credentials and click on Delete button to delete the selected Schedule(s).
Click on Cancel button to discard the action. |

On successful validation, the application will ask for the T&A Device(s) from which the Schedule(s) have to be deleted:
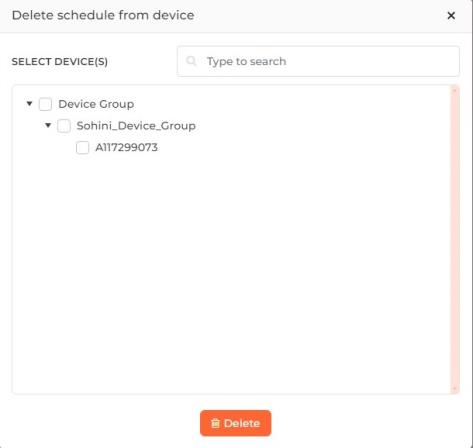
Click on the arrow keys to expand the Device Group and select the desired Device(s) by clicking on the checkboxes.
Once selected, click on Delete button to delete the selected Schedule(s) from the selected Device(s).
Upon completion of the process, the “Application Logs” window will show a success or failure message -
The deleted Schedule will still be displayed on the screen. But the Delete button will be replaced with a Clone button. Click on the Clone button to create another Schedule using the details of the deleted Schedule. You can make required changes to the new Schedule while adding it.
Transfer of Schedule to a Device may be required for Shift Based Access feature (Controlling employee’s access to areas, based on shift timings)
Select Schedule(s) that need to be transferred to the Device(s). To select multiple Schedules, tap and hold CTRL and select the required Schedules. Click on the Transfer button in the top right of the screen to transfer selected Schedule(s) to the selected T&A Device(s). Following screen will be displayed to select the Devices -
Click on the arrow keys to expand the Device Group and select the desired Device(s) by clicking on the checkboxes.
Once selected, click on Send button to transfer the selected Schedule(s) to the selected Device(s).
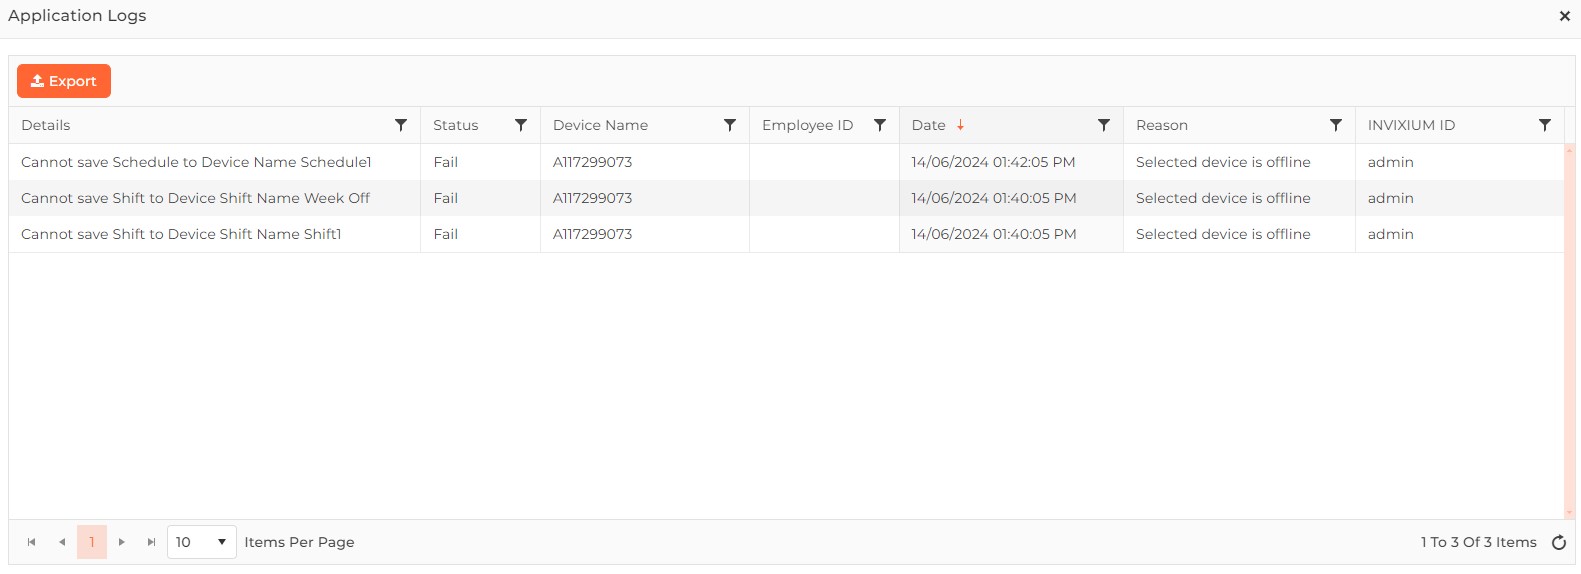
Upon completion of the process, the “Application Logs” window will show a success or failure message -
|
NOTE After Shift and Schedule configuration, admin can assign it to applicable T&A Employees from Employees >> Add/Edit Employee >> Time section.
|
Screen Layout of Shift Assigned
Field Description of Shift Assigned
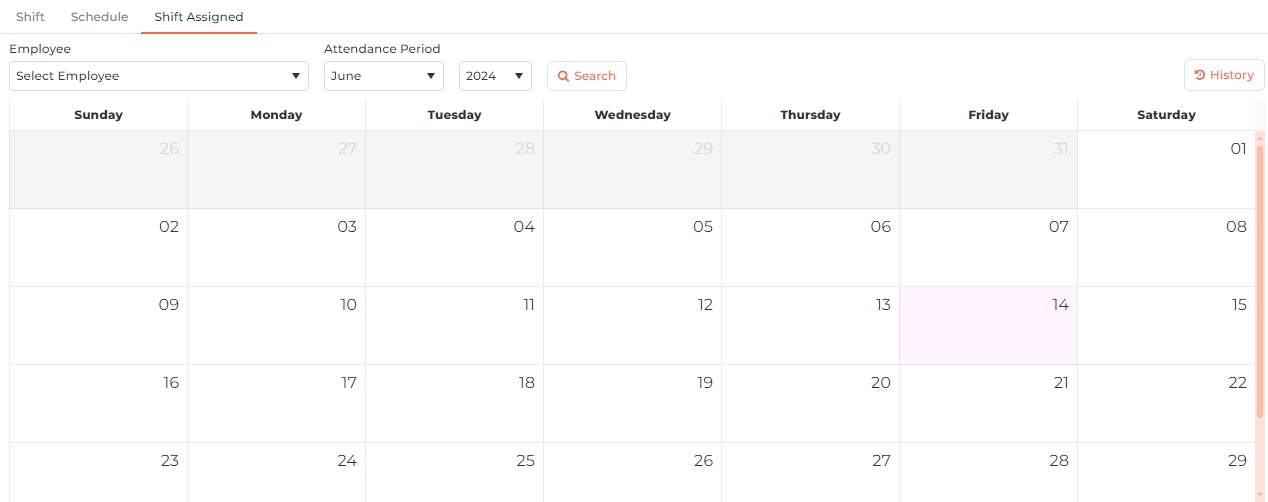
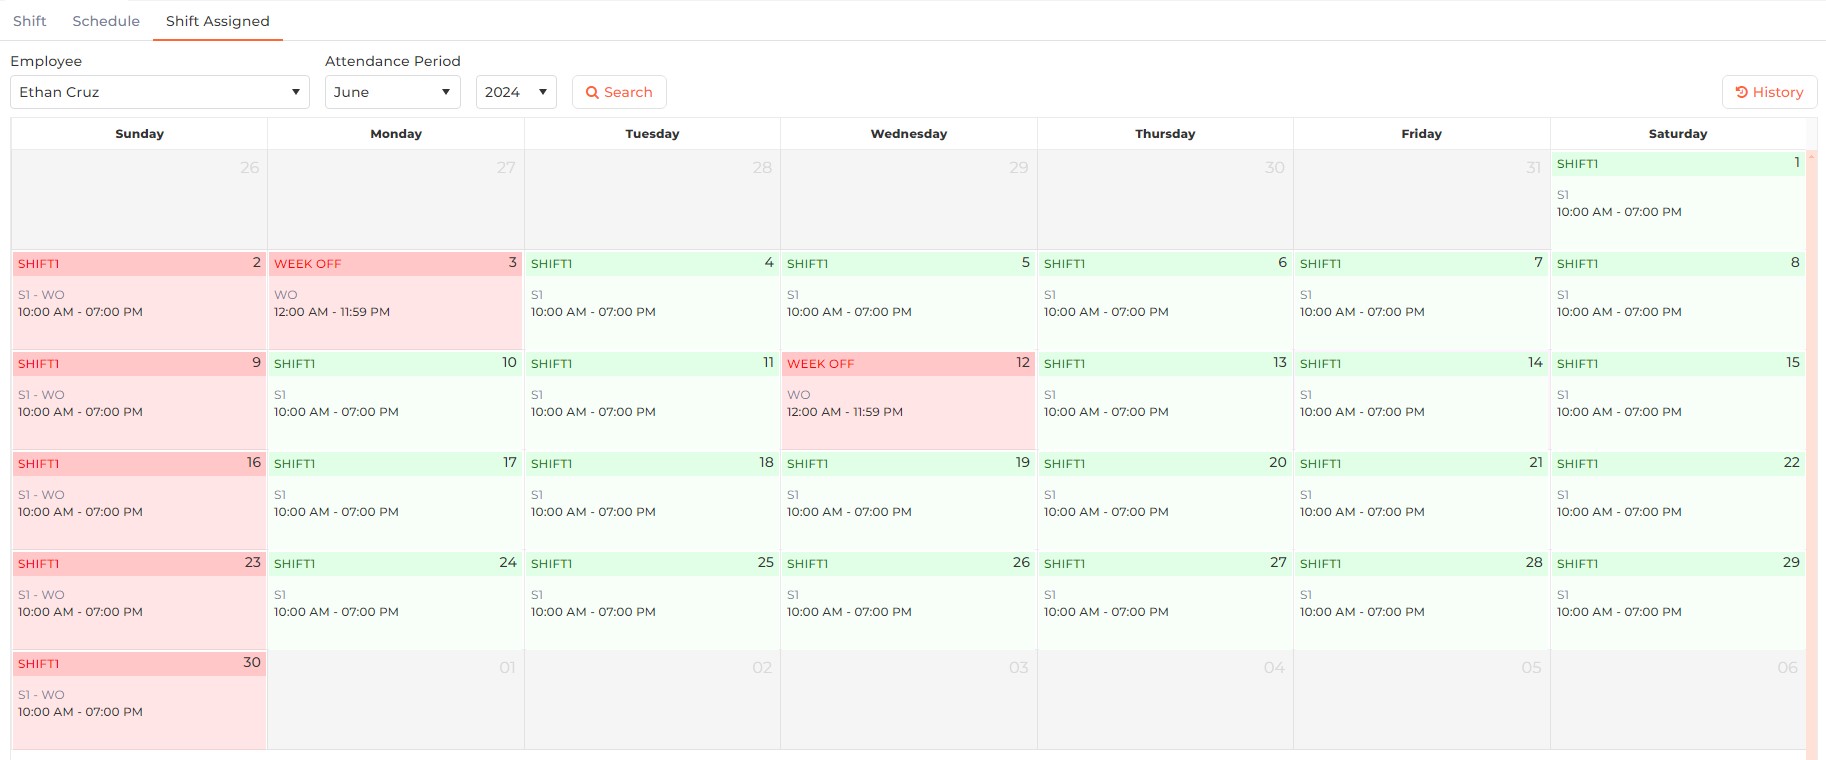
Shift Assigned option allow the user to view the shift chart or roster assigned for each Employee for selected month-year. It also allows IXM WEB users to change and update employee’s Shifts for a selected month.
Employee:
Select the Employee from the dropdown list.
Attendance Period:
Select the Month and Year from the respective dropdown lists.
Click on Search button. Shift chart or the roster assigned to the selected Employee for the selected period will be displayed as follows:
To change the Shift of the Employee, hover the mouse over the Shift that has to be changed, then click on the Change Shift button as follows:

A list of Shifts belonging to the Employee's Shift Schedule will be displayed. Select the desired Shift by clicking on it.
|
NOTE The Shift can not be changed for previous dates or if the Shift has already started for the current date.
|
After making changes, click on the Apply Changes button located in the right corner of the screen to update the shift. The updated shift will then be displayed.
You can view the history of all Shift Changes by clicking on the  button in the top right corner of the screen. A list of all changes will be displayed as follows:
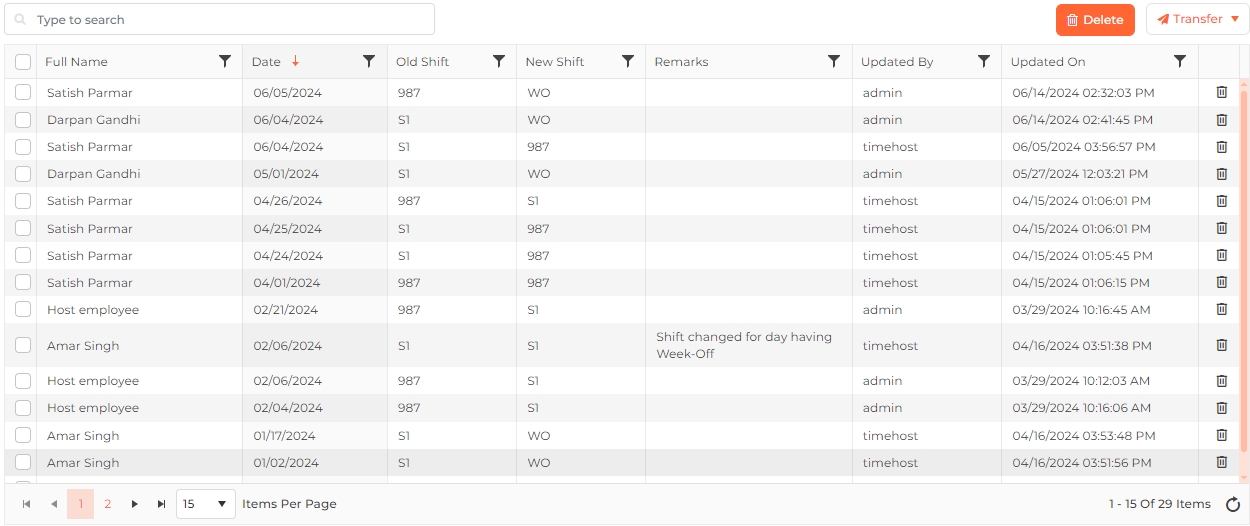
You can delete the Change Shift history of an Employee by clicking on the icon in the last column of row. Alternatively, check the desired Employee(s) in the list and then click on the Delete button.
To transfer Shift Changes to the selected T&A devices, select the desired Shift Changes from the list, then click on the Transfer button. The following screen will be displayed to select the Devices:
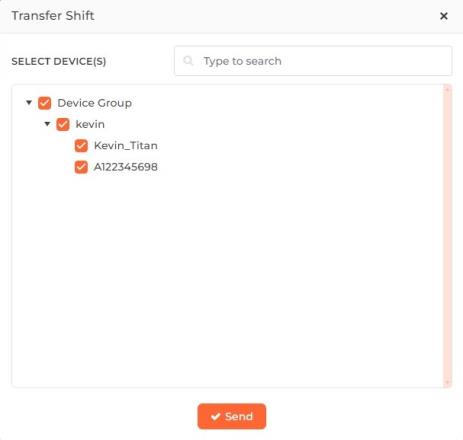
Click on the arrow keys to expand the Device Group and select the desired Device(s) by clicking on the checkboxes.
Once selected, click on Send button to transfer the selected Shift Change(s) to the selected Device(s).
Upon completion of the process, the “Application Logs” window will show a success or failure message.